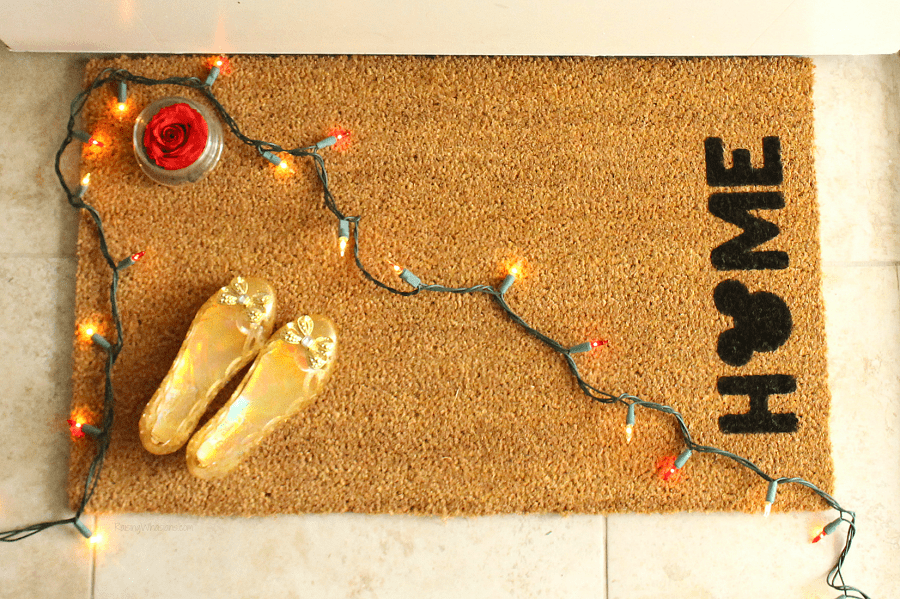
This is a sponsored conversation written by me on behalf of Cricut. The opinions and text are all mine. Create your own door mat for less with this Easy DIY Doormat for Under $10! May contain commissioned links.
Easy DIY Doormat for Under $10
Be our guest! Be our guest! Put our doormat to the test!
It’s no secret that I have been coveting those trendy custom door mats since day 1. But paying for a unique doormat design was way out of my home décor budget. Surely I could make my own, right? But making a custom one for less, now that’s a challenge.
I’m bringing my love of Disney home with this Easy DIY Doormat for under $10! See how this quick tutorial can turn your welcome mat from drab to fab with Cricut and a few DIY supplies that you already own.
Cricut Explore Air 2 Makes DIY Door Mat Stencils EASY!
From wall decals to T-shirt designs to now door mat stencils, I am LOVING the versatility of my Cricut Explore Air 2. With just the variety provided in these 3 projects alone, Cricut has been the best DIY craft investment ever. The precision cutting has been so helpful for my Type-A personality when it comes to crafty projects. Seriously, I don’t know how I ever crafted without one!
Cutting down on time (get the pun?) while providing professional results, I could seriously give my machine a big ole hug and mean it.
Cardstock or Stencil Vinyl for a DIY Doormat?
But back to the magical project at hand. Cardstock. Stencil vinyl. 2 very different materials for a custom doormat. 2 very different price points. I heard that people also use freezer paper for stenciling, but I think the freezer paper is too thin. So which material is better for a DIY doormat stencil?
What I found is that it’s nothing to do with what stencil you use. It’s EVERYTHING to do with how the stencil is secured to your door mat. With stencil vinyl, the sticky backside does help with easier stencil placement onto your mat. However, the pricey cost is what led me to try thick cardstock. Upwards of $8-10 or pennies? I’m going with pennies. Using painter’s tape and straight pins gave me a secure stencil without having to do any touch up. SOLD.
Easy DIY Doormat | Disney Inspired
Who knew that making your own DIY door mat would be this quick? With only a few supplies and a patience, you can have a magical custom mat in no time! So cute, this Easy DIY Doormat is the perfect way to welcome guests, with a not so hidden Mickey. Ready to make yours?
What You Will Need:
- (1) Coir Doormat (got mine at Home Depot for under $10. Also IKEA, Target, Amazon…)
- Cricut Explore Air 2
- (1) Piece of Heavy Cardstock
- (1) 12″ x 12″ Cricut Cutting Mat
- Painters Tape
- Measuring Tape
- (1) Stencil Brush (or small old paintbrush. The harder the bristles, the better)
- Exterior Paint, in color of choice (I used black)
- Straight Pins
- This FREE Disney SVG File
Directions:
- Print out this FREE Disney Doormat SVG File via your Cricut Explore Air 2 onto your Cardstock. Adjust sizing if necessary. But be sure to turn the Cricut Explore Air 2 dial to “Cardstock” before printing.
- Carefully remove the letters from your stencil (you can save for another project!), keeping the stencil intact.
- Measure and tape your stencil securely to your mat. I found that more tape is better, wrapping it around the bottom rubber of the mat’s underside for a better grip.
- Straight pin your cardstock for extra security. I pinned pieces that would tend to be more susceptible to move like the points on the “M.” Using more pins will not hurt your stencil!
- Dip your stencil brush in the paint. Using a gentle up and down dabbing motion, go over your stencil. Be sure to keep the stencil in place while you’re painting.
FYI, you may need a few coats. I did at least 5 here for maximum coverage.
- Allow to dry for at least 24 hours. Then remove stencil and pins.
- You may want to use a small paintbrush to go over any areas for touch up. With this stencil, I didn’t even need to!
- DONE! If desired, feel free to use a clear coat sealant spray to finish the project, especially if your door mat is going to live outside. My exterior paint already had a sealant in there, so no need. I’ll see how my mat looks after a few months.
Looking for more Disney crafty inspiration? Check out these popular posts:


Can we say LOVE?! I’m thrilled with our DIY Disney Doormat. It’s the perfect way for our guests to feel welcome and it’s a great addition to our new home. I cannot wait for many many years of magical visits from friends and family via this custom door mat.
And I’m so thankful for Cricut introducing the Explore Air 2 into my life. It’s has completely changed the way I DIY. And now I’m so ready to take on my next crafty project with confidence.
Would you make an easy DIY doormat? What would your design say?
Be sure to follow Raising Whasians for crafty ideas, easy family recipes, travel tips & more


 FYI, you may need a few coats. I did at least 5 here for maximum coverage.


Leave a Reply